Setup an Amazon CloudFront distribution with SSL, custom domain and S3
We will be hosting a static website in an S3 bucket. Then, we will set up a custom domain together with Route 53 DNS. And finally, we will spin up a CloudFront CDN, link it with our custom domain via Route 53, and secure the whole connection using an SSL certificate and AWS Certificate Manager.
If you're planning to distribute dynamic content (e.g., personalized pages or API responses), check out our CloudFront with EC2 and ALB setup guide to learn how to do it efficiently.
As mentioned, you are going to need a custom domain for this particular setup. You can get one online for free for example at Freenom.
If you want to learn how to deploy this type of architecture in an automated way using AWS CDK (Cloud Development Kit), you can watch our video: Deploying a Static Website with HTTPS using CDK, TypeScript, CloudFront, S3, ACM and Route 53
If you want, you can follow our instructions in the video below, that describes every step in AWS Management Console:
Our workflow today is going to be:
- Set up an S3 bucket
- Set up records in Route 53
- Create a CloudFront CDN distribution
- Create an SSL certificate for HTTPS
- Link the CloudFront CDN, S3, custom domain and SSL certificate via Route 53
S3 Bucket
In this section, we are going to create an S3 bucket, open the bucket for public acess, set it up for static website hosting and upload a simple static website to it. Finally we will test that everything is working correctly by trying to view our website from outside of AWS.
First, we are going to create an S3 bucket:
- Go to your AWS console and search for S3. Click it.
- Click ‘Create Bucket’. Choose a globally unique bucket name and AWS region.
- Untick “Block all public access” and confirm it, since we want our static website accessible from the internet.
- That’s it, you don’t need anything else in this menu and can click ‘Create bucket’.
Then we need to open the bucket to public:
- Open the bucket you just created from the console. The bucket should be empty.
- Click Properties, and then sroll down to Static website hosting and click 'Edit'.
- Choose 'Enable' under "Static website hosting"
- Choose "Host a static website".
- Choose an Index document and an Error document. You can fill in “index.html” into both.
- Hit Save changes.

Finally, we have to edit the Bucket Policies.
- In S3, go over to Permissions. Then Bucket Policy.
- Here you need to fill in a policy which will allow the bucket to be publicly accessed. I recommend using the official AWS policy generator for these purposes, which can be found at: AWS Policy Generator
- At the generator, you need to choose S3 bucket policy as the Type of Policy. Principal will be “*” (without quotes), and Actions will be “GetObject”.
- Fill in your ARN, which can be found in AWS Console where you were about to fill in the bucket policy. There, at the top of the page you should be able to find the ARN in the format of arn:aws:s3:::<bucket_name>.
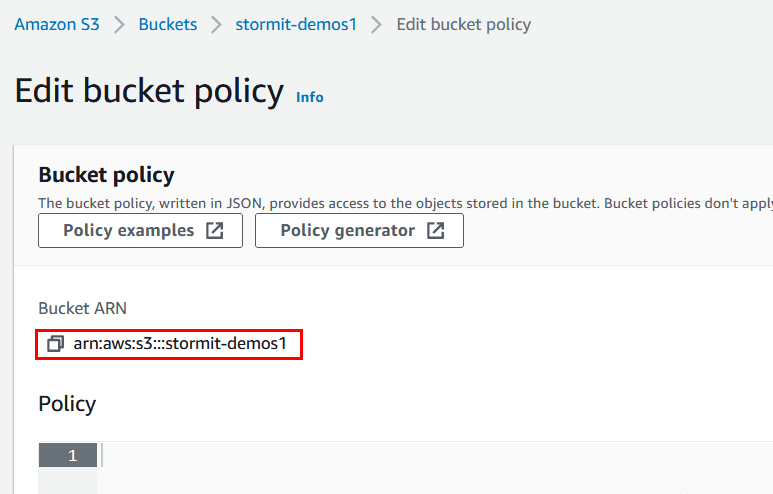
Important: before you paste in the ARN, append a slash and asterisk at the end, so it will look something like: arn:aws:s3:::stormit-demos/* (my bucket name is “stormit-demos1”). This will allow access to everything inside the bucket. Click Add Statement.
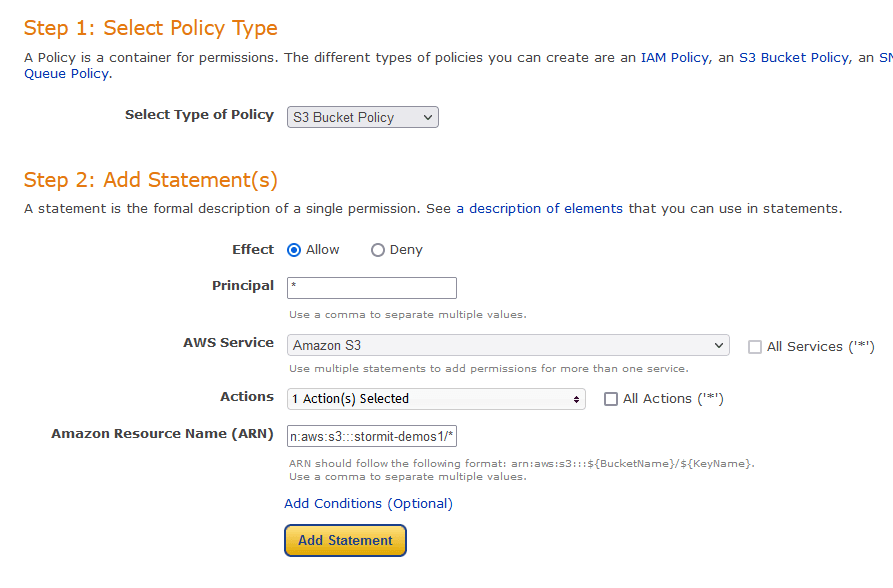
Finally, click Generate policy.
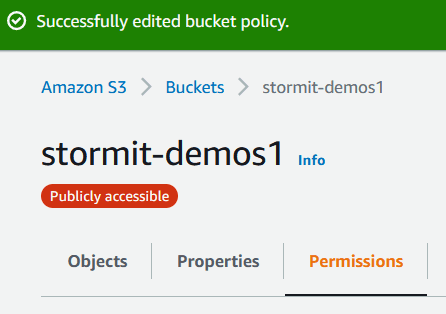
Copy the whole policy over to the S3 AWS console

That’s it for our S3 Bucket setup. When you open your bucket, you should see a red bubble with white text Publicly accessible under the name of your bucket. If you do, everything is correct and we can proceed.
Next, we’re going to upload dummy website files into the bucket & test access to it:
- Download a prepared static website. You can use some other website if you’d like, but keep in mind that the next steps might be a bit different for you if you do.
- In your AWS console inside your S3 Bucket hit Upload, then Add files and upload your index.html file. Hit Upload.
- Click Create folder and create a folder called “images”. Do not use any encryption (default).
- Navigate into the images folder you just created and upload the provided GIF image, same as when we uploaded the index.html.
- Once both files are uploaded, click on index.html within the S3 bucket and locate “Object URL”. Click it. You should see a GIF of a puppy playing with a pillow (assuming you used the provided files).

Congratulations – you’ve just set up an S3 bucket, uploaded a website and opened it for public access. Next, we’re going to set up routing in Route 53.
Check out our blog post to see how the S3 Intelligent-Tiering storage class can help you deliver automatic cost savings by moving data between access tiers: Amazon S3 Intelligent-Tiering: How it Helps to Optimize Storage Costs
Route 53 (first time around):
Create hosted zone in Route 53:
- In your AWS Console search for Route 53 under Services.
- Under ‘DNS management’, click Create hosted zone.
- Inside the ‘Domain name’ field input your domain name. You can obtain one for free from Freenom.
- ‘Type’ will be Public hosted zone.
- Click Create hosted zone.
- Now we need to link our domain with the records in Route 53.
- Note the values as marked on the picture. These are nameservers which we need to link with our domain, basically telling our domain “when someone tries to reach you, you redirect them to one of these servers”.

- Open a new tab in your browser (leave the Route 53 page with the nameservers open) and go to your domain management page, in my case freenom.com. Log in, open the list of your domains and click Manage Domain. Under Management Tools click Nameservers. You should see 5 text fields named Nameserver 1-5.
- Go back to your Route 53 nameserver page and copy the URLs one by one to the fields in your domain management page. Important: copy the URLS over without the dot at the end. So for example you’d copy “ns-869.awsdns-44.net.” as “ns-869.awsdns-44.net” (without the dot at the end).

- Once you’ve copied everything, confirm by clicking Change Nameservers.
- That’s it for Route 53 for now, but we will return to it later.
Now we want to set up an SSL certificate via the AWS Certificate Manager in order to secure our CloudFront custom domain with SSL.
AWS Certificate Manager
- In your AWS Console search for Certificate Manager and click the link.
- Important: You have to select the AWS North Virginia region(US-East-1). CloudFront recognizes only this region as it's ACM certificates.

- Click Get started under Provision certificates
- Click Request a public certificate and then Request a certificate.
- Fill in the Domain name (in my case it is stormit-demos1.cf), click Next.
- Choose a method of validation, I recommend DNS validation.
- We do not need anything else, so continue clicking Next until you can Confirm and request the certificate.
- On the next screen you’ll see that the certificate status is “Pending validation”. In order for it to get validated we need to link it with our Route 53 records, and we can do that by clicking on the “Certificate ID”.

- Next click on Create record in Route 53 button under Domains.

- Then click Create records.

- That’s it for the Certificate Manager. It can take up to 30 minutes for the certificate to be issued so try to be patient.
After the certificate is issued, we can set up the last element in our deployment, which is a CloudFront distribution.
CloudFront Ditribution
In this section, we are going to spin up a CloudFront CDN distribution with an S3 bucket so that when anyone tries to access our distribution, they will actually be accessing our S3 bucket while taking advantage of the speed of CloudFront.
Create CloudFront distribution
- In your AWS Console search for CloudFront and click the link.
- Click Create Distribution. On the next page click Get Started in the Web section, since we will be wanting a web distribution.
- You should see an Origin settings page with many options and fields.
- For the Origin Domain Name, you will need to go back to your S3 management console (Services -> S3), but leave the CloudFront setup page open. Once in the S3 management console, click on your bucket name, then click on Properties and scroll down to Static website hosting. Copy over the highlighted part of the Endpoint URL:

- Go back to the CloudFront setup page and paste the URL inside the Origin Domain Name field*.* You may notice that AWS already offers you an S3 option from the drop down list, but that wouldn't point to the actual website.

CloudFront SSL certificate:
- Under Viewer Protocol Policy choose Redirect HTTP to HTTPS
- Now scroll all the way down to the Alternate Domain Names (CNAMEs) field and type in your domain name without http(s), i.e. example_domain.com
- Under Settings, choose Custom SSL Certificate for CloudFront SSL encryption*.* Click into the field below - the SSL certificate you provisioned earlier should be offered to you. Choose it.

- That's it. Click Create Distribution at the very bottom of the page.
- The distribution takes about 10-20 minutes to provision. Once it is provisioned (Status = Deployed, State = Enabled), you can test it by pasting the URL under Domain Name into your browser. You should see the website you uploaded into S3.
We are almost done, we have S3, CloudFront SSL certificate, but there's one more step we need to take. If you go ahead and try to load your domain name in your web browser, you'll notice that the page can't be loaded. That is because all we have to do now is to create a record in Route 53 and basically tell it to direct traffic from your domain to your CloudFront distribution.
Stormit team has a proven track record of experience and delivered projects with Amazon CloudFront and is proud to be designated as the AWS Service Delivery Partner for the Amazon CloudFront CDN service.
We provide special pricing for organizations transferring as little as 1 TB of data per month and have saved companies up to 60% on their CDN data transfer-out costs.
Route 53 (revisited)
- Click Services and type in Route 53, click the link. Click the name of your hosted zone.
- Click Create record. Choose Simple routing, click Next and then Define record.
- Click the dropdown menu at Value/Route traffic to and choose Alias to CloudFront distribution.
- Choose the distribution you provisioned previously.
- Notice that the only available region is US East (N. Virgina)[us-east-1]. This is due to the fact that we provisioned an SSL Certificate via AWS Certificate manager. This service is only available in US East 1.
- Click Create Records.

And that's it. All you have to do now is wait a few minutes for the DNS records to update and try to load your domain name. If everything went correctly, you should see your static website distributed via CloudFront.
If not, please try to retrace your steps following this guide or have a look at our Video Guide.
Hope you enjoyed this guide and happy clouding!

An AWS Solutions Architect with over 5 years of experience in designing, assessing, and optimizing AWS cloud architectures. At Stormit, he supports customers across the full cloud lifecycle — from pre-sales consulting and solution design to AWS funding programs such as AWS Activate, Proof of Concept (PoC), and the Migration Acceleration Program (MAP).

