Creating a CloudFront Distribution for Amazon EC2 and ALB
Serving dynamic content fast isn’t easy – but yes, you can do it with CloudFront, ALB, and EC2. This setup helps you reduce latency, offload your backend, and improve user experience. Let’s break down how it works.
Amazon CloudFront‘s network of edge locations gives you the ability to distribute static and dynamic content to your users at high speed with low latency.
Dynamic content is something that is a problem to cache, but in this blog post, we are introducing a set of features that, taken together, allow you to use CloudFront to serve dynamic, personalized content more quickly. We also show you how you can use CloudFront, Application Load Balancer (ALB) and EC2 instances behind it to speed access to your dynamic and static content.
What is dynamic content?
Dynamic content refers to web content that changes based on user behavior, preferences, and interests. It refers to website content, which is generated when a user requests a page.
Dynamic content is personalized and adjusted based on the data you have about your users and the time of visit, intending to provide your visitors with an engaging and satisfying online experience.

Often powered by applications and scripts, dynamic content works in tandem with static content.
A typical example is the HTML content of a landing page, which changes based on location or previous interaction with the website to display information relevant to the viewer.
Why use Amazon CloudFront for dynamic content?
Using a traditional server-based approach can add more load to your web server and the underlying database. It can also be challenging to scale out or handle spiky workloads.
With CloudFront, your end user's connections are terminated at CloudFront edge locations closer to them, which helps to reduce the overall round trip time required to establish a connection.

Interested in other CloudFront use cases? See how it works in front of API Gateway.
Benefits of CloudFront for dynamic content

1. Persistent TCP Connections:
Establishing a TCP connection takes some time because each new connection requires a three-way handshake between the server and client. CloudFront leverages persistent connections to each origin for dynamic content. Reusing these "long-distance" connections back to the server can eliminate hundreds of milliseconds from SSL handshake.
Here is a simple example of the SSL connection of Route 53 health checks directly to ALB and to CloudFront distribution.

As you can see, the SSL handshake with CloudFront is a couple of hundreds of milliseconds quicker than directly with ALB (Cloudfront 20ms, ALB around 700ms) and the time to the first byte is also quicker (Cloudfront around 570ms, ALB around 880ms). These are global stats.
2. Optimize data transfer costs
Data transfer from AWS resources (EC2, S3, ELB) to the public Internet can create significant expenditure. Data transfers between these common AWS services and CloudFront edge locations worldwide are free of charge. CloudFront also has better pricing for Data Transfer Out (DTO) to the public Internet, so with this solution, you can reduce the cost of DTO.
Obviously, every project/case is unique, but we are confident that by smartly using CloudFront it is possible to achieve overall lower costs and improved performance.Estimate savings
3. Enhanced security
With CloudFront as the entry point to your network, you can move possible attacks to its level and protect your underlying IT infrastructure.
CloudFront integrates seamlessly with AWS WAF (Web Application Firewall), providing an additional layer of security. This allows you to use rules that filter out common web exploits, which can be applied directly at the CloudFront edge locations. By blocking these malicious requests at the edge,** you reduce the load on your origin servers and protect your application from a wide range of attacks before they can even reach your infrastructure.**To dive deeper into how AWS WAF integrates with CloudFront, check out our detailed blog post at AWS WAF and CloudFront Integration.
CloudFront accepts only well-formed connections and reduces the number of requests and TCP connections that return to your web application. These will help you prevent many common DDoS attacks, such as SYN floods and UDP reflection attacks, because they won't reach your origin.
Additionally, a geo-distributed architecture will help you isolate these attacks close to them, allowing you to continue serving your applications without any impact elsewhere.
Starting February 2022, you can use the AWS managed prefix-list for CloudFront to limit the inbound HTTP/HTTPS traffic to your origins(ALB's, EC2 instances) from only the IP addresses that belong to CloudFront’s origin-facing servers.
4. Overall performance
CloudFront always finds the fastest way to deliver your content by constantly measuring the speed of transfer through multiple routes to ensure that each request reaches your server as quickly as possible.
Some of your content can be served from CloudFront caches, so your origin server doesn’t have to serve everything itself and you can even have a less powerful origin instance or instances.
For communication with other AWS services, CloudFront uses AWS Backbone network (Amazon’s custom-built network with the highest standards), which enables the effective transfer of data between Edge Locations and services like EC2, S3, etc.
5. Specific functions
- Multiple Origins: You can reference multiple origins (sources of content) from a single CloudFront distribution. This means that you could, for example, serve images from Amazon S3 and dynamic content from EC2 and ALB.
- Query Strings: CloudFront uses the query string as part of its cache key (example.com/over/there?user=james1). This optional feature gives you the ability to cache content at the edge that is specific to a particular user.
- Cache behaviors: You can select the types of files (*jpg, *png, *mp4) or even whole folders (paths) that you want to cache and which you do not.
Expert Advice
Enhance Security with CloudFront
Leveraging CloudFront's integration with AWS Web Application Firewall allows you to filter out malicious traffic at the edge, reducing load on your origin servers and boosting security.
Dynamic content acceleration with AWS CloudFront, EC2, and ALB
One of the most common AWS architectures for dynamic content distribution is based on Amazon EC2, an Auto-Scaling group, and Elastic Load Balancer (ELB), in this case, Application Load Balancer (ALB).

Let’s look at how to add CloudFront distribution to this infrastructure and how to create an ALB with SSL termination and Route 53 record.

This infrastructure will use SSL (HTTPS) termination on ALB, so your users can connect only via HTTPS to this App. As an example EC2 server, I'm using a WordPress Bitnami instance from which I have created an Auto-Scaling group.
You need your domain name (example.com) and ACM (Amazon Certificate Manager) public certificate for using HTTPS. If you need a test domain, try visiting Freenom.
What we already have in this example:
- Infrastructure based in the Frankfurt (eu-central-1) region.
- Amazon EC2 instances with Bitnami WordPress AMI.
- AMI image and Launch template.
- The auto-scaling group with a dynamic scaling policy (named: WordPress-app) that spans two AZs.
- Two ACM public certificates for the test domain (route53test.cf), one in the Frankfurt (eu-central-1) region for ALB, and the second in North Virginia (us-east-1) for CloudFront distribution and Route 53.
Creating an AWS Application Load Balancer (ALB) with HTTPS listener
1. Open the EC2 console.
2. Click on Load Balancers in the left panel.
3. Click on Create Load Balancer.
4. Choose Application Load Balancer (ALB).
5. a. Fill in the load balancer name and select “Internet-facing” as a scheme.

b. Select VPC and Subnets.

c. Select “Security group”. This security group has to allow access to ports 80 and 443.

d.Select listener protocol: HTTPS (443) and click on “Create target group”.

e. Fill in the Target group name and select Protocol HTTP:80. This is necessary because we just want to terminate the https connection on our ALB. Click “Next”.

f. Select instances you want to include and click on “Include as pending below”.

g. Click on “Create target group” and you can go back to the panel where we started the creation process of our ALB.
h. Select “Forward to” our new target group (WordPress-app).

i. Select “ACM public certificate” or any other certificate you want to use. The certificate has to be in the region in which you are creating the ALB; ours is in the Frankfurt region.

j. Click “Create Load Balancer”.
k. The new ALB should be in an active state after a couple of minutes.

l. It’s also necessary to go back to your Auto-Scaling group and edit it. If you do not do this, your instances could be changed by Auto-Scaling, and your ALB will stop working properly.

m. Choose your target group so it is associated with your Auto-Scaling group.

Creating CloudFront distribution with ALB as an origin
1. Go to CloudFront Console.
2. Click “Create distribution”.
3. a. Choose our new Application Load Balancer as an origin and Protocol: HTTPS only.
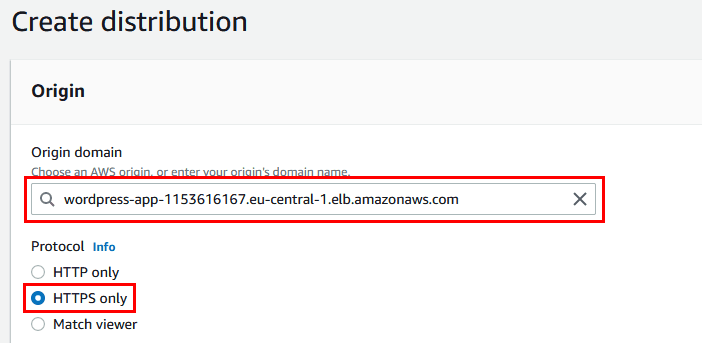
b. Select Viewer protocol policy: “Redirect HTTP to HTTPS”.

c. You can select Caching disabled for Dynamic content and then create a caching policy for specific folders that you want to cache in CloudFront Edge locations. Then select Origin request policy: AllViewer.

d. Add a domain name to Alternate domain name (CNAME) and choose the SSL certificate from ACM. The certificate has to be in the N. Virginia region (us-east-1).

e. Click “Create distribution” and wait a couple of minutes for our CloudFront distribution to be deployed. You should not be able to hit the direct CloudFront URL (you should get a 503 error). We have to create records in DNS and go through our domain name (route53test.cf).
Creating cache behaviors in CloudFront distribution for static content
We have set our default cache behavior so that caching is disabled, but some of the contents of our WordPress application are static so we want to cache it.
1. In the CloudFront console click on the new distribution and go to “Behaviors” and click on “Create behavior”.

2. a. Fill in path pattern, select origin as our ALB and Viewer protocol policy: “Redirect HTTP to HTTPS”.

b. Select Cache policy: CachingOptimized and Origin request policy: AllViewer.

c. Click “Create behavior”.
Creating Route 53 domain records for CloudFront distribution
You already should have a Route 53 hosted zone created, because the validation of the ACM certificate requires it.
1. Open Route 53 console and go to the hosted zone (route53test.cf).
2. Click “Create records”.
3. The routing policy should be Simple routing. Select Route traffic to: Alias to CloudFront distribution and URL of the CloudFront distribution.
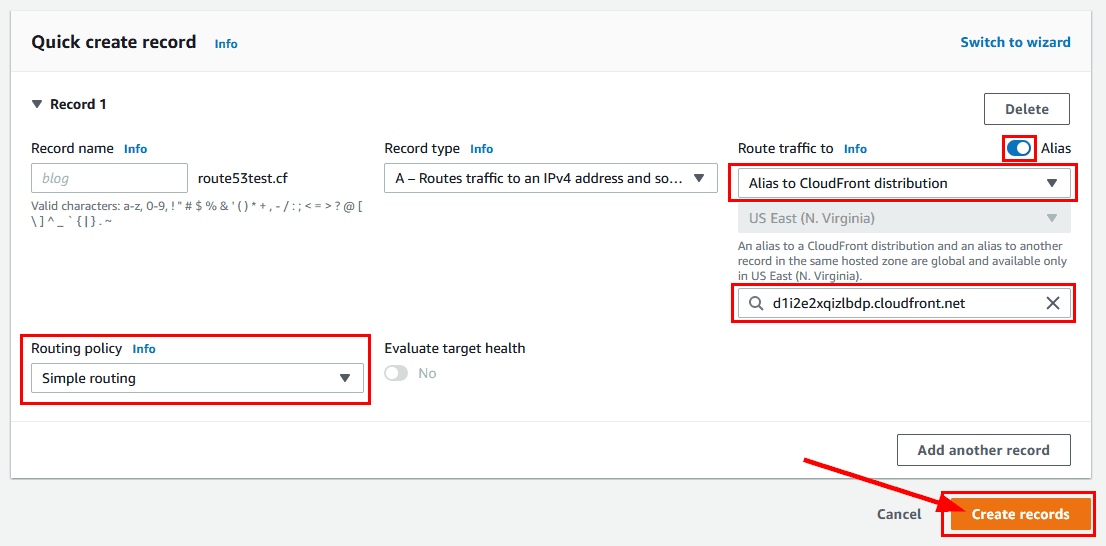
4. It can take some time to propagate these DNS settings.
Check your cloud infrastructure with a free AWS Well-Architected Review Our experts can focus on optimizing your CloudFront setup as part of this comprehensive evaluation. Get started today and ensure your architecture is robust, scalable, and secure.
FAQs
Yes. Configure your Application Load Balancer (ALB) or an EC2 instance as a custom origin in CloudFront. The distribution will then serve traffic from edge locations while fetching from the ALB/EC2 origin when needed.
Lower latency (TLS termination at the edge + persistent origin connections), caching for cacheable files, global reach, Shield Standard protection , consolidated logging/domains, and potential cost savings thanks to fewer origin hits.
It can – if responses are cacheable. Set proper Cache-Control/Expires headers and use a Cache Policy that varies only on the headers/cookies/query strings that truly change the response. Leave non-cacheable endpoints as pass-through with special Cache behaviors.
Either make the ALB private and use CloudFront VC origins, or if it must be public, restrict its security group to CloudFront origin-facing IP ranges (AWS-managed prefix list). Use AWS WAF on CloudFront for additional filtering.
There’s no regional data-transfer charge from AWS origins (ALB/EC2/S3) to CloudFront ($0/GB for origin fetches). You still pay ALB charges (e.g., LCUs) and CloudFront requests/egress, so overall savings depend on cache hit ratio and traffic mix.
Conclusion
We looked at the benefits of distributing your dynamic content with CloudFront and how to create a distribution with SSL for ALB and EC2 instances. I hope this helps you decide to start distributing your content with CloudFront to benefit from its advantages such as caching, cost optimization, and SSL handshaking.
Want to learn how to deploy an EC2 instance, CloudFront, and Route 53 domain without an Application Load Balancer?

An AWS Solutions Architect with over 5 years of experience in designing, assessing, and optimizing AWS cloud architectures. At Stormit, he supports customers across the full cloud lifecycle — from pre-sales consulting and solution design to AWS funding programs such as AWS Activate, Proof of Concept (PoC), and the Migration Acceleration Program (MAP).

